ML-agent 2.2.1 설치
Unity ML-agent는 Unity에서 제공해주는 강화학습 툴입니다.
https://unity.com/kr/products/machine-learning-agents
머신러닝 에이전트
심층 학습 기술을 활용하는 툴킷으로 지능적인 반응형 에이전트를 만들어 보세요.
unity.com
22.11.22 기준 2.3.0 버전까지 릴리즈되어 있으며, 이 게시글에서는 2.2.1 버전을 다룰 예정입니다.
참고 및 출처
[유니티 TUTORIAL] ML-Agents 설치 & 예제 환경 정복하기
발표 자료
(+ 안에 원래 예제 실행 영상도 있었는데, 용량 제한으로 인해 pdf로 업로드 합니다.
1) ML-Agent 란

ML-Agent란 Machine Learning Agent로 기계 학습 중 강화 학습을 다루는 툴입니다.
강화 학습이란, agent가 환경에서 어떤 행동(Action)을 했을 때 환경으로부터 1) 행동 이후의 상태(State) 및 2) 보상(Reward)을 받게 되는데,
이때 더 많은 보상을 받을 수 있는 행동 패턴, 정책을 학습하는 것입니다.

Unity에서 강화 학습을 위한 환경과 agent를 제공하면, 외부 프로그램(ML-agent & Pytorch)로 머신러닝과 관련된 모델을 학습하게 되는 것입니다. 이것으로 agent의 행동을 결정하게 됩니다.
ML-agent에 대한 설명은 여기까지 하기로 하고 이제 설치를 해보도록 하겠습니다.
설치
Unity github installation 가이드를 보면 유니티, 파이썬, ml-agent의 설치가 필요하다고 나와있습니다.
https://github.com/Unity-Technologies/ml-agents/blob/release_19_docs/docs/Installation.md
GitHub - Unity-Technologies/ml-agents: The Unity Machine Learning Agents Toolkit (ML-Agents) is an open-source project that enab
The Unity Machine Learning Agents Toolkit (ML-Agents) is an open-source project that enables games and simulations to serve as environments for training intelligent agents using deep reinforcement ...
github.com

ml-agent는 git clone으로 저장소를 내려받지 않아도, 아래 이미지의 code 버튼을 누르면 zip 파일을 다운 받을 수 있기 때문에 release_19 branch의 파일을 다운 받아도 괜찮습니다.

먼저 Unity를 다운받자면, 아래 Unity Hub를 먼저 다운 받고,
다운로드 아카이브에서 2020.3 이상 버전을 다운받으면 됩니다.
Get Unity - Download Archive - Unity
Unity is the ultimate game development platform. Use Unity to build high-quality 3D and 2D games, deploy them across mobile, desktop, VR/AR, consoles or the Web, and connect with loyal and enthusiastic players and customers.
unity3d.com
Python은 아래 사이트에서 3.6.1 이상 버전을 다운 받으면 됩니다.
https://www.python.org/downloads/
Download Python
The official home of the Python Programming Language
www.python.org
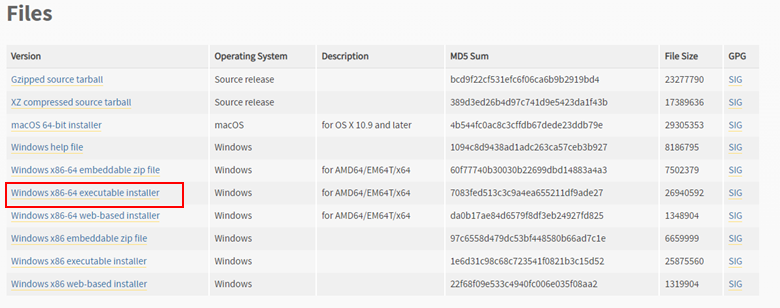
https://www.python.org/ -> Downloads -> All release -> 3.7.9 Windows x86-64 executable installer
다운로드 및 설치 과정에서, 환경변수 체크 및 글자수 260자 제한 풀기 를 선택하시면 됩니다.
ml-agent를 clone 받습니다.
$ git clone --branch release_19 https://github.com/Unity-Technologies/ml-agents.git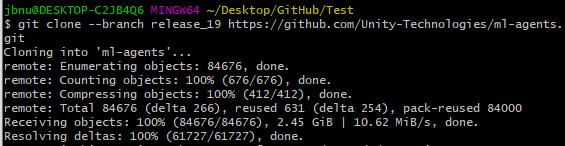
추가로 pytorch와 (만약 GPU가 있다면) CUDA, cuDNN을 설치합니다.
$ pip3 install torch torchvision torchaudio --extra-index-url https://download.pytorch.org/whl/cu113
ml-agents-envs 환경을 설치합니다.
$ pip install --upgrade pip
$ pip install -e ./ml-agents-envs/
ml-agents를 설치합니다.
$ pip install -e ./ml-agents/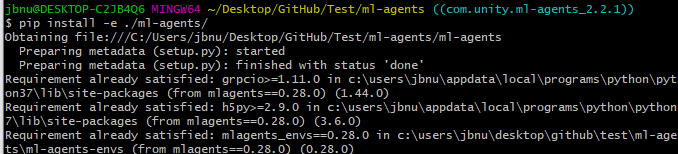
컴퓨터에 설치하는 건 이제 끝났습니다.
Unity에서 적용해보도록 하겠습니다.
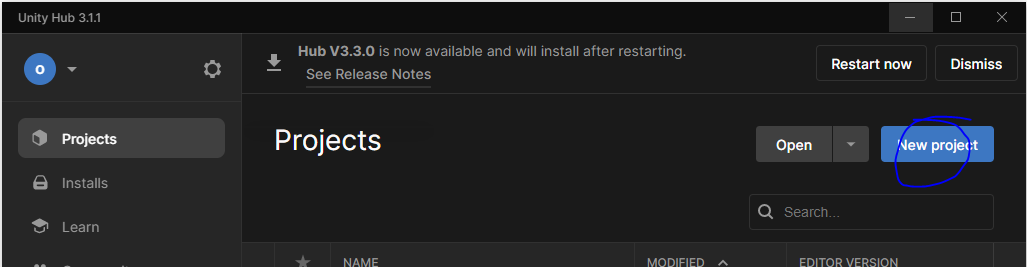
다운 받은 Unity Hub를 켜고 프로젝트를 생성합니다.
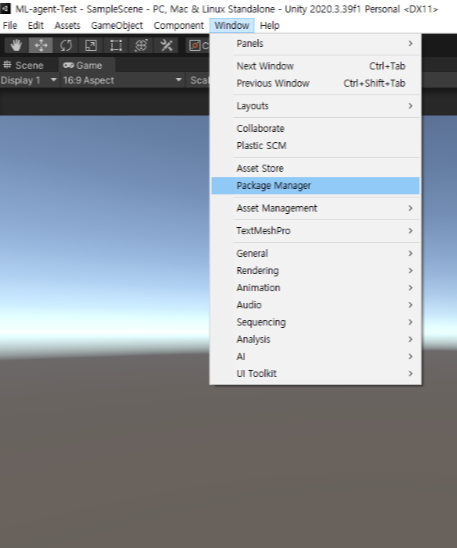
프로젝트 생성 후 Unity 창의 Window -> Package Manager를 클릭합니다.
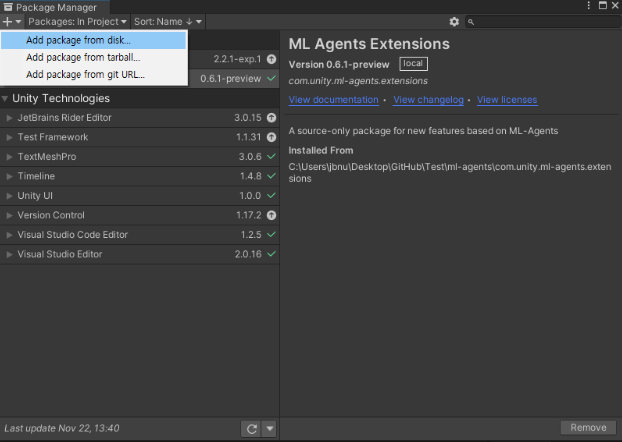
Package Manager 좌상단의 '+' 버튼을 누르고 Add package from disk.. 를 눌러
Clone 받은 ml-agent 폴더에서 com.unity.ml-agents와 com.unity.ml-agents.extensions 안 package 파일을 import 합니다.
설치가 완료되었습니다.
이제 Unity에 적용하려고 할 때마다 package만 import 해주면 사용할 수 있습니다.